Showing posts with label black. Show all posts

Wednesday, August 8, 2012

Feather Nails


I've always loved the look of feather nails, but I just do not have the patience to freehand a feather, or, even moreso, use a real feather.  So, when I saw this design in my new SHANY plates, I knew I had to give it a try.  To complete this look, I...

1. Painted my nails a base color of Nails Inc Black Taxi.
2. Using China Glaze Adore, I stamped the plume design from SHANY plate SH24
3. Applied a coat of topcoat on my ring finger and applied 3 2mm light blue rhinestones to the design on my ring finger.
4. Sealed in the rhinestones and the stamped design on the rest of my fingers using Sally Hansen Insta-Dri.

I know I've said it a thousand times, but outside of the specific stamping polishes, the China Glaze Romantiques (like Adore) are absolutely perfect for stamping.  I don't think they are in China Glaze's regular line-up, but they still are available.  I got mine, years ago, from Victoria's Nail Supply, but you can find them all over the internet.  


Nails Inc Black Taxi was provided for review.  Other products within this post were purchased by me.  The included link is not an affiliate link.


Wednesday, August 1, 2012

KBShimmer Newsprint


This is 2 coats of Newsprint over 2 coats of Deborah Lippmann Stormy Weather.  

When I first saw the polishes on KBShimmer's website, Newsprint was the first one I was drawn to.  Unfortunately, I wasn't able to pick it up in my first order, as Christy said she had an issue with the red bar glitter and was waiting on a replacement.  However, as soon as I saw that it had been restocked, I placed another order before I'd even received my first on.  I wanted it that much.  

Newsprint is one of the more unique indie glitters in my collection and it's easily one of my favorites.  It's a mix of red, white, black, and silver glitters in all sorts of shapes and sizes suspended in a dark grey base.  There are bars, hexes, sqaures, and microglitter.  In fact, on KBShimmer's product page for this polish, it states that 14 glitters went in to this polish.  

I had no issues with application or formula on this.  The glitters easily came out of the bottle and were dispersed well on the nail.  I think you could possibly reach opacity with this polish, but to keep from adding so many layers on my nails, which can lead to goopy-ness, I chose to layer it over Deborah Lippmann Stormy Weather.  

KBShimmer polishes are available on their website, and sell for $8.50 a bottle.  Please note that if you are international, KBShimmer only sells directly to US customers.  If you are outside of the US, you will need to purchase their polishes from their stockist, Harlow & Co.  KBShimmer polishes from Harlow & Co sell for $9 a bottle.  Currently Harlow & Co is out of stock on all KBShimmer polishes, but I read that there should be a restock this weekend.  


Newsprint was purchased by me.  All links within this post are not affiliate links.


Tuesday, July 31, 2012

Candy Lacquer Polishes

Today, I have for you three colors by indie polish maker, Candy Lacquer.


Argyle - white, turquoise, and black diamond glitter, as well as white and black bar glitter in a clear base.  As soon as I saw a bottle pick of Argyle on another blog, I fell instantly in love and I knew I had to get it.  As soon as Candy Lacquer's Etsy store was reopened, Argyle was the first one I put in my cart.  Once I got it home, I love it even more... in the bottle.  Unfortunately, it was a pain to put on my nail.  I ended up pouring some out into a palette and then putting individual pieces of glitter on my nails with an orange stick.  Even with this method, it was still bumpy and I had bubbles after I put on a topcoat.  That said, I think it is still super awesome (can you look at my blog redesign and tell me what inspired it? LOL), and I still want to play around with it to see if I can find a better way of application.


Starlight - multi-sizes and shapes (there are stars!) of silver holographic glitter in a clear base.  I threw this one in my cart on a whim and I'm so happy I did.  Of the 3 Candy Lacquers I picked up, Starlight has the best application.  The glitters came out of the bottle easily, even the stars!  


White Wedding - multi-shaped and sized matte white glitter in a clear base.  Okay, so let's be honest... I got this one for the name.  I also thought that it looked super cool in the bottle, but really... I got it for the name.  LOL.  So when I got it home, I was pleasantly surprised.  I love this one over the bright red of Sooki, and think it would look equally as pretty over just about every color.  Application on this one was a little harder than Starlight, but nowhere near as difficult as Argyle.  I did have to go digging for the hearts, but that's to be expected.  


All in all, I really like the 3 polishes I picked up from Candy Lacquer.  Shipping was super quick and the owner, Sandra, was extremely pleasant.  I kind of wish that application on a few of them was a little easier, but honestly, with big glitters, you kind of know going in to it that you may have issues with application.

Candy Lacquers are $8 a bottle are available through their Etsy store (though it is currently closed).  For more information on restocks, please check their Facebook page.  


Argyle, Starlight, and White Wedding were purchased by me.  Links included within this post are not affiliate links.

Monday, July 23, 2012

Jamberry Nails by Kate Review and Fundraiser

I recently contacted by Katie, an independent sales representative for Jamberry Nails, asking if I would be interested in trying out Jamberry's Nail Sheilds.  As I had been very curious about their nail shields, I said yes.

I received them a few days ago, and just got a chance to apply them and review them...


This is the Jamberry Nail Shields design in Silver, Gold & Black Plaid, which features a shiny black base (so shiny it was a little hard to get a clear picture) with a diagonal plaid design in silver, gold, and white.  It's may not the best design for my skin tone, but it was so pretty that I had to try it first.  

Also, as this is my first time applying Jamberry shields, I am very much a novice, so there are things I would do differently in my next go-around (which I will post soon), but for a first try, I think I did pretty good.  

Jamberry nail shields are a little different that most other press-on/stick-on nail products.  They are a pressure  sensitive film, rather than foils or polish, such as Sally Hansen Salon Effects or Broadway imPRESS nails.  That means that they will last longer.  The flip side of that is that they are little more time consuming to apply.  

You apply them to clean and prepped nails using a hair dryer and a cuticle pusher (along with scissors and a nail file).  It took me almost 1.5 hours to apply mine.  but that's because I am a total noob and wasn't exactly sure of what to do.  The instructions are very clear, but with any new product, there is a learning curve.  Hence, the over-filing on my middle finger and the mile of nail showing on my pinky.  LOL.

Additionally, Jamberry shields are different as with one package, you can do 2, possibly 3, manicures.  In each package, their are 18 shields, each of which can be cut in half and even in thirds if you want to use them on your toes.  Jamberry Nail Shields sell for $15 a package.  However, they are currently running a "buy 3 get 1" promotion, which makes them $11.25 a package, when you purchase 4.  Considering Sally Hansen Salon Effects are $8.50 for a package, I think the Jamberry Nails (which can essentially be broken down to $5.62 a manicure, when you purchase 4 designs) are a pretty good deal!  


If you are interested in purchasing Jamberry Nail Shields, please be sure to check out Katie's website, and please follow her on Facebook.  Furthermore, I have teamed up with the fabulous Katie to host an Autism Awareness fundraiser.  Currently, on her site, Katie is hosting a party titled "Autism Awareness Fundraiser".  This party runs until 7/31/2012, and during this time, Katie is donating all of her commission earned from this party to Autism Awareness!  As you all know, this is an issue that is very near and dear to my heart, so the more people that participate this party, the greater the donation will be to this cause.

Also, Katie is offering a fabulous incentive for those of you participating in this fundraiser!  Once the party is complete, she will pick one name, from those of you that participated, and that person will be able to pick 4 additional nail shields at no cost to the winner.  That is a $60 value!  Best part? There are no forms to enter, simply order Jamberry Nails Shields from Katie using the Autism Awareness Fundraiser party link, and you are automatically entered.  


Plus... I am also hosting a giveaway to coincide with this fundraiser and I will post more information on that on Tuesday  Wednesday (sorry, life got in the way), so stay tuned!


Jamberry Nail Shields were provided by Katie for review.  The above links link to Katie's Jamberry Nails website and Facebook page, as well as the application instruction for Jamberry Nails and they are not affiliate links.

Thursday, July 19, 2012

KBShimmer Showgirl

Showgirl is one of 5 KBShimmer polishes I have to show you over the next few days.  I swatched all of them at once and then and picked my favorite to show you first...


Isn't she pretty?  This is 2 coats of Showgirl over one coat of Nails Inc Black Taxi.  I opted to layer all of my KBShimmer polishes, and I especially chose to layer this one because it's a black jelly base.  I had a feeling that the glitter wouldn't "come out and play" as much if I had to use multiple layers to reach opacity.

 Showgirl is a mix of holo silver square and round glitter, as well as fuchsia glitter and micro-glitter in a black jelly base.  She is unbelievable unique and I can't wait to wear it as a full manicure.  

Like I mentioned, this is one of 5 KBShimmer polishes that I purchased, and I have to say, I am very pleased with (most) them in terms of formula and application.  A lot of times, indie glitters have a tendency to want to stay in the bottle.  I can't tell you how many times I've had to dig for hearts, or stars, or moons, or whatever else big, chunky glitters in the bottle.  

With Showgirl, and most of the other KBShimmers I'm going to show you, the application was mindless.  I did have to hunt a little bit to get the square glitters, but I simply dipped the brush back in the bottle and there they were.  It wasn't a drawn out process.  In fact, the formula on these reminds me very much of the now-unavailable NerdLacquers (and that's saying something because my lone NerdLacquer has an amazing formula and it's one of my favorites to apply).

KBShimmer polishes are available at KBShimmer's website.  However, they only ship polish within the U.S.  If you are international, please visit their stockist, Harlow & Co.  Polishes sell for $8.50 from KBShimmer directly and $9.00 from Harlow & Co.


Showgirl was purchased by me.  The above links link to websites to purchase this polish and are not affiliate links.

Sunday, July 15, 2012

Lush Lacquer Pink Panther

This is 2 coats of Lush Lacquer Pink Panther over 2 coats of Nails Inc Floral Street.  

Pink Panther consists of a mix of white, black, and pink multi-sized and multi-shaped, matte glitters in a clear base.  I love this when layered over the white base.  

The polish went on very well.  The glitter is very densely packed and this is one of those glitters that doesn't make you go fishing in the bottle!  See how dense it is...


Lush Lacquer has several polishes in their Etsy store (I'm eyeing Lite Brite).  Full bottles are $8.75 and you can order custom sets of minis for $9.50 and up.

Fair warning, these are essentially pre-orders.  Unlike a lot of other indie polish companies, Lush Lacquer keeps all of their polishes listed on their website at all times.  The downside of this is that you have to wait for your polishes (currently turn-around time is 2+ weeks).  The upside is that you don't have to wait for the seller to return from "on vacation" and you avoid the made "OMG it's open!" stampede.  Personally, I don't mind waiting on the polish if I know it's coming (I hate the mad Etsy or Big Cartel rushes).  I just wish that Lush Lacquer was a little more open about the fact that these are not in-stock at time of order.  I think they have done this recently, but when I ordered, I just assumed they were in-stock and then I got a little antsy after a week had passed.


Pink Panther was purchased by me.  The above link links to Lush Lacquer's Etsy store and is not an affiliate link. 

Saturday, July 14, 2012

Golden Lace Stamped Nails


For this manicure, I used 2 coats of Zoya Goldie as a base and then stamped a design using 2 stamping designs and Konad Special Polish in black.  

I recently purchased Goldie during Zoya's 3 for $10 Share the Love promotion.  I had been wanting to try it for quite a while, but never got around to purchasing it.  Golds are so iffy with me.  I have mentioned my love/hate relationship with gold polishes several times on this blog.  I adore gold polishes in the bottle.  Unfortunately, if the gold polish is a bright and strong shade of gold, it makes my hands look not-so-good.  So, when I read on Zoya's website that Goldie is in the "cool" family, I thought maybe, just maybe, it would work my skin.  Sadly, it gives me red-hands as well. 

Because of this, I figured I would have to use Goldie as a base for layering or for nail art.  That's when I decided to try this design.  It had been floating around in my head for a few weeks, and I really love the way it came out.  To create the lace, I first stamped the fishnet design from Konad plate m57.  I then stamped the all-over roses design from Konad plate m65 over the fishnet.  I then topped the whole thing with 2 coats of Sally Hansen Insta-Dri topcoat (it was still a little rough after one coat).


Zoya Goldie was purchased by me.  The above link links to the product page for Zoya Goldie on Zoya's website and it is connected to my Share the Love account.  When you make a purchase using my referral link, I will receive points which I can use towards Share the Love promotions.  If you prefer not to use my Share the Love link, please go to www.zoya.com.  

Friday, July 13, 2012

Nails Inc Black Taxi & Floral Street

Or as I should subtitle this post... "the perfect black and white creme polishes".

White and black polishes seem like something so simple.  They don't seem like something that it would take a person years to find the perfect one of each.  And yet, that's been an issue with me.  For me, a perfect white creme and a perfect black creme have been almost impossible to find.

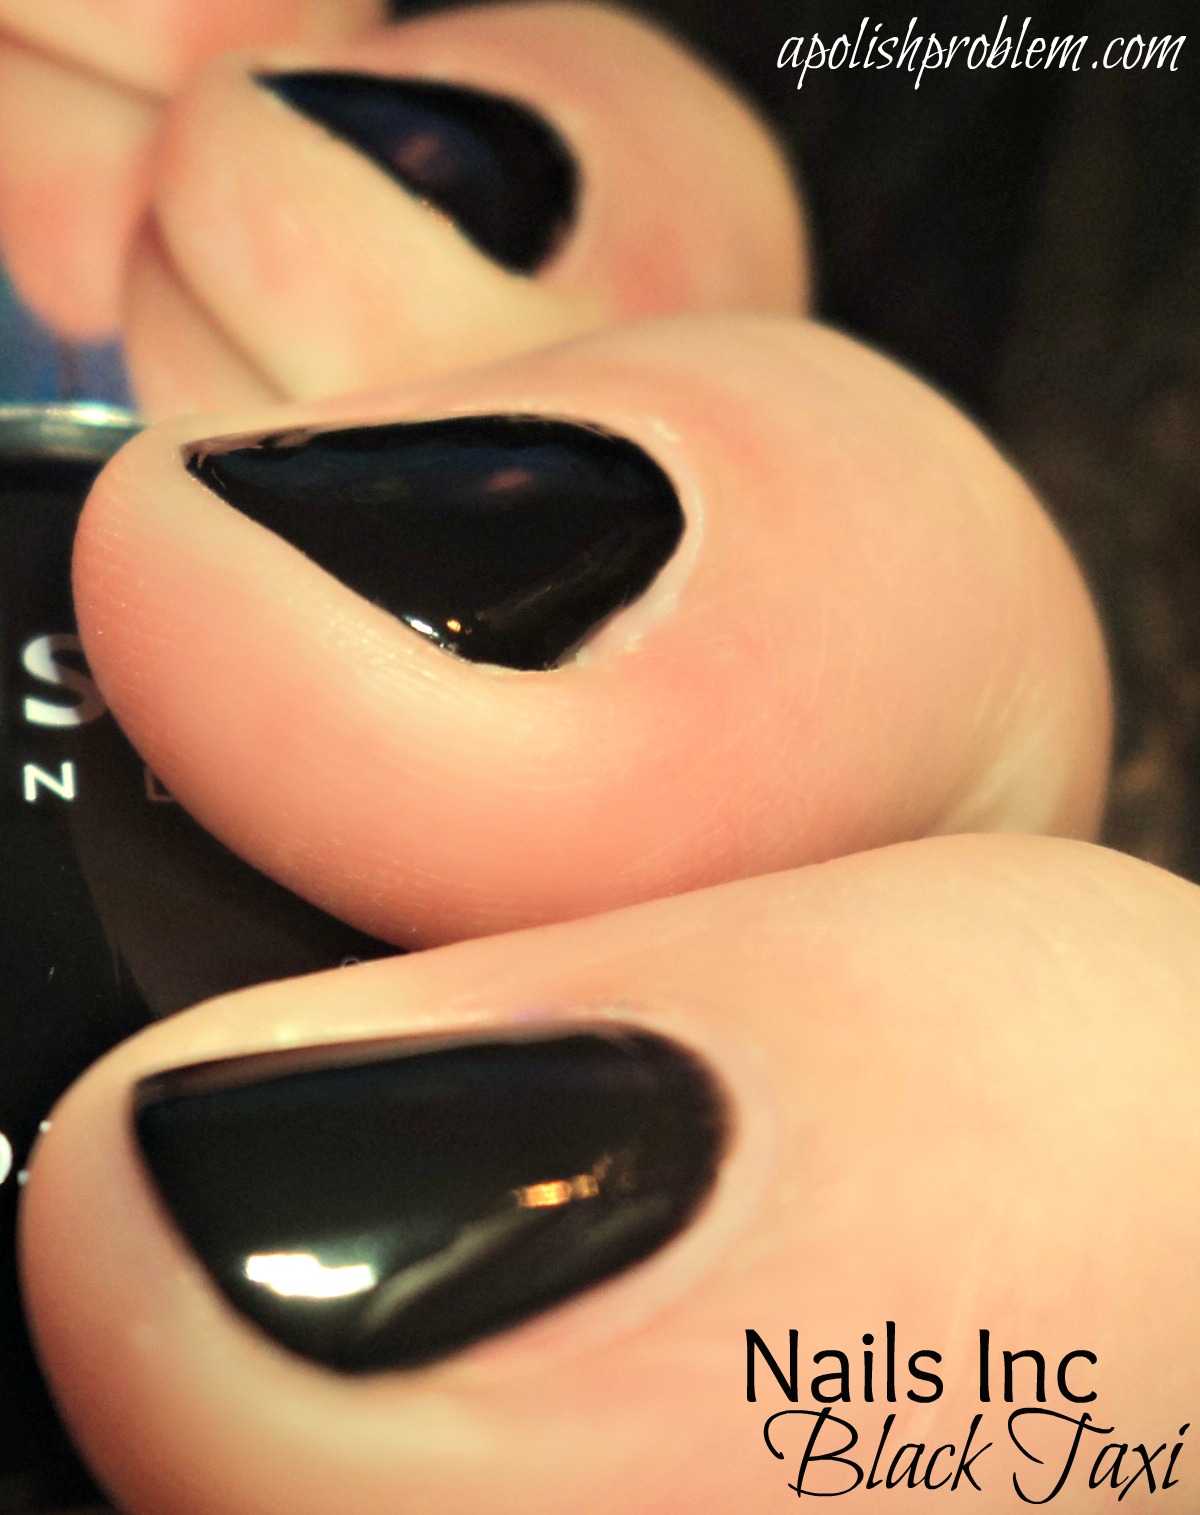
That was until I received Nails Inc Black Taxi (black) and Nails Inc Floral Street (white).  As I have been showing them off under all sorts of polishes over the past few weeks, I figured I would show you them by themselves.  They really are perfect...


Black Taxi - highly-pigmented, rich black creme.  Like I mentioned above, finding one-coat black creme has been impossible for me.  I've tried several options and have been disappointed with each of them, in one way or another.  Black Taxi, however, is perfect.  The formula flows incredibly well and is completely opaque in one coat. 


Floral Street - white creme.  Like a black creme, a non-chalky, non-streaky white creme has been very hard for me to find.  My issue with whites is that it takes too long to reach opacity.  And while I have yet to find a one-coat white creme, Floral Street is opaque in 2 coats and it doesn't look like you are wearing Wite-Out on your nails.  Like Black Taxi, this one has a very nice formula and flows well on the nails. 

As I've mentioned about 50 times in this post (LOL) Black Taxi and Floral Street are pretty much my perfect black and white cremes.  My only issue with them is that they are a bit expensive at $9.50 for a 0.33 fl oz bottle.  That said, I will gladly pay it in the future, as they are fantastic for what they are.  You can find both of these polishes in the US at Sephora stores and at Sephora.com


Nails Inc Black Taxi and Floral Street were sent to me for review.  The above link links to these polishes on Sephora.com and is not an affiliate link.


Monday, July 9, 2012

Deborah Lippmann Dream a Little Dream of Me

So, I have become a little addicted to Deborah Lippmann's polishes.  It seems like as soon as I say I'm done, HSN will have a fabulous deal to which that I just can't say no.  My most recent purchase from HSN included the Run the World (Girls) neon box set (review coming soon), as well as a duo of Don't Tell Mama and Dream a Little Dream of Me.  

Honestly, I wasn't going to get the duo.  Yes, it was clearanced out for less than $10, but it also only had one color I thought I would like, and that color was Don't Tell Mama.  In the end, I decided to get it for Don't Tell Mama, and I, pretty much, thought of Dream a Little Dream of Me as a throw-away color.  And once I got it home, my opinion was, unfortunately, not changed...

It's a sheer candy pink with blue, iridescent micro-shimmer.  I really did not like this polish alone on my nails.  The color didn't work with my skin, and for a pink polish, I have no idea how it made my nails appear yellow.  The above picture is 3 coats and I am nowhere near opacity.  So, I was all set to chuck it in my reject box when I decided to layer it over black.  This is what I discovered...


The above 2 pictures show 2 coats of Dream a Little Dream of Me over 2 coats of Nails Inc Black Taxi.

Isn't it amazing?  It doesn't even look like the same polish.  Layering it over a dark base color, completely turns this one from a "no" to a resounding "YES".  The dark base essentially makes the sheer pink base color go away and you are left with the amazing blue shimmer.  This really reminds me of the long-discontinued China Glaze Blk Bila Bong or maybe even Chanel Nuit de Russie.  

I think this would look fantastic layered over other dark bases as well.  I can't wait to try it over a navy blue or a deep, vampy purple. 

Deborah Lippmann Dream a Little Dream of Me can be found at various online stores including HSN.com (where I purchased mine).  I got mine in a clearance duo, which is sadly out of stock now, but HSN still carries this polish as a single.  Dream a Little Dream of Me retails for $16 a bottle.


Deborah Lippmann Dream a Little Dream of Me was purchased by me.  The above link links to this product at HSN.com and is not an affiliate link.  

Wednesday, June 27, 2012

Dollish Polish Putting on the Ritz


This is 2 coats of Putting on the Ritz over 3 coats of Julep Lauren, a bright fuchsia pink creme.

Putting on the Ritz is a mix of small and large black and white hex glitter in a clear base.  If you have been lemming one of the indie black and white glitter topcoats, but don't like bar glitter, then Putting on the Ritz is the perfect solution.  

Although, it's not that easy to find, as Dollish Polish is one of the more well-known indie-polish brands.  However, Dolly announced that this Friday she is restocking this polish, along with Aurora Borealis, Spank You Very Much, Random Dancing, and Urban Camo, on her website.  Unfortunately, she doesn't give exact times, though, so you have to stalk her site all day.  

Also, to help with availability, Dollish Polish is available at Overall Beauty (though with limited products and she's OOS now) and the brand is coming to Llarowe next month.  

On her website, Dollish Polish sells for $8.75 per full-sized bottle and $4.50 for a mini.  Be sure to follow her on Facebook for more information about the restocks. 


Dollish Polish Putting on the Ritz was purchased by me.  Julep Lauren was in my last Julep Maven box.  The above links link to a post on this blog, Dollish Polish's Facebook page, and various websites to purchase the products used in this post and are not affiliate links.   

Tuesday, June 26, 2012

Nails Inc. Burlington Arcade

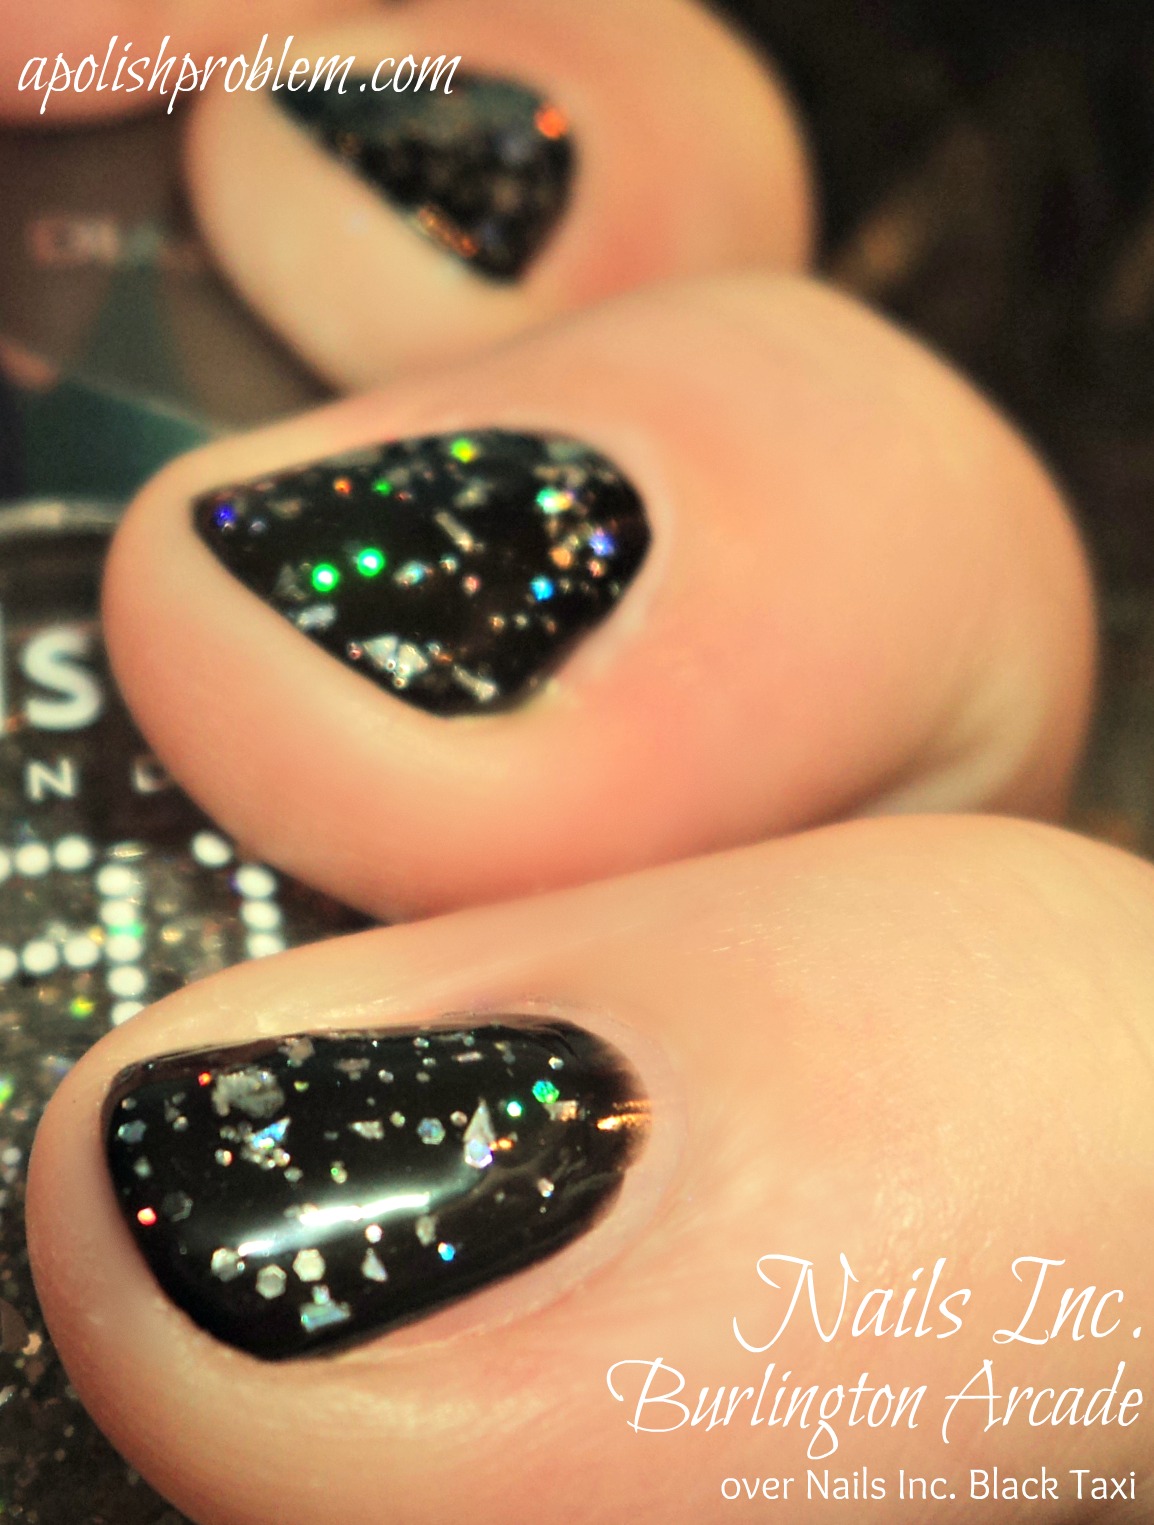
For this summer, Nails Inc has released several small "nail effects" collections.  One of those collections is Nail Jewelry, which consists of four glitter top coats designed to "adorn your nails like precious jewels".  The four polishes in this collection are... Picadilly Arcade (emerald), Princess Arcade (pink diamond), Royal Arcade (sapphire), and Burlington Arcade (diamond).  Of the four, I received Burlington Arcade, the "diamond" topcoat, for review...

Burlington Arcade is a mix of silver, holographic glitter of various sizes and shapes in a clear base.  There are also shards of glitter in this one and while usually, glitter shards are on my "no-go" list, I actually don't mind them in this polish.  I think that's because they are smaller and lay flat on the nail.  

While I was swatching it, tt almost reminded me of one of the many "indie" glitter topcoats now available, simply because of the various sizes and shapes to the glitter.  Although, it's nowhere near as chunky as some indie shard-glitter topcoats I've seen.  Application on this one was perfect.  The polish flowed smoothly on the nail and there was no glitter-drag.  

I have seen swatches of the other polishes within the Nail Jewelry collection and it looks like it may be possible to almost reach opacity with the other colors.  However, with Burlington Arcade, that is not the case.  The above picture is 3 coats and I was nowhere near reaching opacity.  I did like that it gave my natural nails a flash of shimmer, though.  

I like it on my natural nails, but this is absolutely beautiful when it is layered, and, honestly, that's the whole point of this collection...


This is 2 coats of Burlington Arcade over 2 coats of Nails Inc Black Taxi, a rich black creme.  I love this over black.  It's very dramatic, and think the dark base is a perfect backdrop for this topcoat.  I really like how the black enhances the rainbow of colors that come out in the holo glitter.  That said,  my favorite way to wear this is below...


This is 3 coats of Burlington Arcade over 2 coats of Nails Inc Floral Street, an opaque, white creme.  Believe it or not, as stunning as this was over Black Taxi, it was just as beautiful when layered over this saturated white.  Unfortunately, in pictures this combination doesn't want to show off as much as Burlington Arcade + Black Taxi, but trust me... it is so, so pretty.  It's also a much more subtle look (as subtle as you can get with holo, chunky glitter.  LOL).  


I think you can guess, I absolutely love Burlington Arcade.  The multitude of glitter sizes and shapes sets it apart from other silver holo glitter topcoats, in my opinion.  I really liked it over black, but it was amazing over white.  Because of this baby, I can't wait to try the Nail Jewelry in other colors.  I've heard that Royal Arcade layered over Baker Street is especially gorgeous.     

You can find all 4 of the Nails Inc Nail Jewelry polishes at Sephora.com.  Price is $9.50 for a 0.33 fl oz bottle.  


All polishes shown within this post were sent to me for review by Nails Inc's PR.  The above link links to this product on Sephora.com and is not an affiliate link.

Friday, May 25, 2012

Minnie Mouse Nails


Right before I was getting ready to remove Zoya Layla, I decided to play around with stamping and nail art (this has become a common occurrence for me).  This design was created using the polka-dot stamp from BundleMonster plate BM19.  I used Konad Special Polish in white for the dots.  I then added a black french and a silver glitter, using a glitter striper to hide any unevenness in my line.  To create the black french, I first stamped a french design on my nail using BundleMonster plate B39 and Konad Special Polish in Black.  I then filled in the design of the french, making it solid, using Color Club Where's the Soiree.  It's not a traditional way to create a french, but so much easier than freehanding or using french guides.  

I really wasn't even thinking of Minnie Mouse when I came up with the design.  However, once I completed it, I looked down and that's the first thing that popped in my head.  I think this design is so cute and if I wasn't ready to remove Layla, I probably would have kept it on my nails.

Wednesday, May 16, 2012

X Out Inspired Nail Art Project

Recently, I received an email from Gunthy-Renker's PR regarding a nail art project they are hosting for one of their brands, X Out.  X Out is a acne medication specifically for teens, created by the founders of Proactiv.

The idea behind the project is to create an nail art look inspired by X Out's packaging and manifesto.  For every participating blogger in this project, Gunthy-Renker will donate $200 to Pacer's National Bullying Prevention Center.  As soon as I read that, I was more than happy to participate.  <3

To assist with the idea process, X Out sent out a a PR image of their packaging for X Out, as well as their "manifesto"...


When I first saw the PR images, my mind immediately thought of a literal translation to take the letter "X" and words from their packaging, and put them on my  nails.  The only problem is that I kind of stink at freehand nail art and I really don't have any proper supplies for freehand art (my kids steal my brushes).  Thus, I realized I needed to think more outside of the box.

So I re-read the "manifesto" and remembered just what it was like to be a teenager.  I'm 37, which to teens may seem old, but honestly, I feel like I was just there (guess my parents really weren't as ancient as I made them out to be.  :P).  I remembered being pulled in a thousand directions, all-the-while trying to be somewhat cool and get my resume college-ready at the same time.  Now that I have a mortgage and kids and I'm 20 years out of high school, it all seems somewhat simpler than life now, but I definitely remember high school being a stressful time.  I also remember it being fun and a little (lot) crazy.

So I took all of that in to consideration and this is what I came up with...


Using the colors in X Out's packaging and "manifesto", I used Zoya Malia and Zoya Yummy to create a gradient as the base.  This is 2 coats of Malia with 2 coats of Yummy sponged over top.  I then used Konad Special Polish in black to stamp the "stars and arrows" design from BundleMonster plate BM20 over the gradient.  I then added one coat of Deborah Bring on the Bling over the stamp to add a bit of sparkle.  

I really, really loved the final product on this and it has spawned tons of other ideas in my head.  It also got me compliments from the drive-thru girl at Burger King (it makes my day when people ask to see my nails).  :)  

I hope you girls love this one as much as I do.  If you are interested in more information on X Out, please check out their website.  For more information on the Pacer's National Anti-Bullying Prevention center, please click on the link above.  


X Out packaging and manifesto images were provided by Gunthy-Renker's PR.  The links within this post are not affiliate links.

Saturday, April 28, 2012

30 Days of Blues for Autism Awareness - Nicole by OPI "Baby" Blue

Today is Day 28 in the "30 Days of Blues"...


This is Nicole by OPI "Baby" Blue, a light blue, as the base color.  I then topped Baby Blue with a coat of Nicole by OPI Rich in Spirit, a silvery-blue foil, on my tips.  I then stamped a design using BundleMonster plate B39 and Konad Black Special Polish.  

Sorry so short today, but I have a gazillion things to do.  Plus, it's one of those rare days where I'm just not feeling very wordy.  

Thank you so much for reading my "30 Days" posts.  Just 2 days left.  As always, you can email me at megan@apolishproblem with any suggestions, questions, or comments.

Thursday, April 19, 2012

The New Black - "Graffiti" Ombre Set Review

Yesterday, I showed the second of the ombre sets from The New Black, and today, I have for you the black/grey ombre set, "Graffiti".

Just to be clear, this set contains five 0.125 fl oz bottles that are intended to be used to create an ombre manicure.  Ombres are something I have grown to love, have occasionally tried, and usually failed.  These sets from The New Black basically take all the guesswork out of creating the perfect ombre manicure, and they contain a good combination of glitters, shimmers, and cremes...


I have labelled each of the polishes within the picture.  I did this one in reverse order, light to dark from thumb to pinky.  Here are the descriptions of the pictures in order from thumb to pinky...

Bright Silver Glitter in a Clear Base - when I first saw this one, I wasn't impressed, and I then I put it on my nails and I was practically blinded by it.  It looks like a frickin' Miss America tiara on your nails.  It would be very hard to reach opacity, though, as it's not quite thick enough.  I used 4 coats on the above swatch, and I still had bald spots.

Bright Silver - pretty standard silver metallic, though this one is verrrry bright.  It almost looks polished.  Formula was fine and took 2 coats to reach opacity.

Medium Grey with Blue, Purple, and Pink Shimmer - this one is where it get's interesting.  This polish is fantastic.  The shimmer stands out in this one and is quite the contrast with the grey base color.  2 coats.

Black Jelly with Gold and Silver Glitter - okay, remember in yesterday's post when I wished The New Black would sell a few of their polishes separately, in larger bottles?  Well this polish would be at the top of the list.  I cannot tell you how amazing this polish is.  It's not a traditional jelly, in that you can reach opacity, but it's also not a creme.  It is jam-packed with glitter, but it's not gritty.  Formula was great.  2 coats.

Jet Black Creme - this is a nice black creme.  It was completely opaque in 2 coats and I had no formula issues.


I like this set.  I really like the way it goes from a deep, jet black to a bright, super-sparkly silver glitter.  But the stars of the show, in my opinion, are the grey and the black jelly.


And because I could... here is a picture of the Black Jelly with Gold and Silver Glitter used as a full mani...

I am completely in love with it.  


Again these polishes come in a set.  For your reference, here is a PR shot of the full set...


These sets retail for $22 and are available online and at major department stores.  Best news... The New Black is now available at Sephora.com.  


This set was sent to me for review.  The picture of the 5 pc set was sent to me by The New Black's PR.  

Thursday, April 12, 2012

30 Days of Blues for Autism Awareness - Zoya Breezi

Today is Day 12 in my "30 Days of Blues" for Autism Awareness and today's blue polish is Zoya Breezi...


I apologize for only have one photo today.  I've been trying to take more shots of my manicures, including outdoor pictures, but I just wasn't satisfied with any of the pictures I took for today, so I had to go with the one photo that was, in my opinion, relatively decent.

Anyway, Zoya Breezi is a dusty, medium-toned Aegean blue creme.  This polish is from Zoya's Summertime collection from Summer 2011.  It's dustier and deeper than Zoya Robyn.  The formula on Breezi is fantastic.  She was almost a one-coater, but I did 2 because there were a few thin spots.  I just realized that I have used several Zoyas in my "30 Days" posts.  I'm guessing that's because, at some point, Zoya has replaced OPI as my favorite brand.  OPI will always have my favorite pro-wide brush, but I am finding myself constantly impressed with Zoya's formula and their color range.

Zoya Breezi is available for purchase from Zoya's website.  Zoyas retail for $8 a bottle, though I highly recommend that you follow them on Facebook and/or Twitter, as they frequently offer promotions.

And because no manicure is no complete with out something over it, I went with a simply konad design over my tips in Konad Black Special Polish (which streaked on me something awful, despite waiting several minutes for it to dry) using a floral design from Konad plate m51.

Thank you so much for reading my "30 Days of Blues" posts.  I hope to be back posting collection reviews within the next few days, in addition to the blue polish posts.  I had a nasty break on my middle fingernail that I'm trying to grow out just a bit.


Zoya Breezi was sent to me for review


Friday, April 6, 2012

30 Days of Blues for Autism Awareness - Black and White and Blue All Over

Hi everyone.  Today is my 7th day of my "30 Days of Blues" for Autism Awareness.  Today, the idea for my manicure came from the oddest of places... my contacts case.  The other day, I was having a moment of "manicure block" and my eye then focused on my contacts case sitting on my desk and I had a sudden moment of inspiration.  I knew I would have to do a konad for the manicure for it to look right, so I just kind of tucked it away for future use, but once I found my konad supplies tonight (I'm reorganzing my stash), I knew I had to do it.

For your reference, this is a picture of my contacts case.  Well, mine is all faded (hence the generic picture), but this is what it looked like when it was new...
And here is what I came up with...


This is 3 coats of Zoya Robyn (I am addicted to this one) with OPI Alpine Snow Matte on my ring finger.  I then stamped a design from Konad plate m63 using Konad polish in black.

I am in love with this one.  Seriously... L-O-V-E.  You know when your manicure looks so pretty that you can't stop looking at it?  I'm like that with this one.  And I needed that kind of happy.  Today was a very autistic-fueled day.  

By the way, this was my first time konadding in almost 2 years and I think I've got the bug again.  LOL.  I keep thinking of designs.

Hope you all are enjoying my "30 Days of Blues".  Please feel free to participate with me.  If you are a blogger participating in Autism Awareness month (in any capacity), please let me know and I will feature your blog on my sidebar.  You can reply in this post or email me at megan@apolishproblem.com.

Friday, March 30, 2012

Today's Nails - NerdLacquer It's Just a Flesh Wound

I apologize for the lack of NOTD posts this week.  As I mentioned in my Blogger Round-Up reminder post, it's been a crazy week.  I've had a few merchandising jobs, as well as a sick girl child, so my free time has gone out the window.  In fact, today is the first chance I've had to polish my nails since Monday. I wasn't even gonna bother with it today, but then I got my NerdLacquer purchase in the mail and I had to put the baby on my nails...


This is NerdLacquer It's Just a Flesh Wound.  This polish a deep charcoal, almost black, base with red, silver, black, and gold multi-sized and shaped glitter.  It kind of reminds me of those black with red shimmer polishes (i.e. ChG Lubu Heels, OPI Midnight in Moscow, and RBL Black Russian) that were so popular a few years ago.  I don't own Black Russian, but I know with Lubu Heels and, especially, Midnight in Moscow, the red shimmer in those polishes seems to sink in to the black base and rather than sparkling, it just ends up looking muddy.  However, unlike those polishes, the red (and the gold and the silver) in this polish really stands out.  It did eat top coat a bit, so this does have 2 coats of Nubar Diamont over top.  Also, I wanted to mention, that in my experience, there was a bit of a learning curve in applying this polish.  It's packed with glitter, so if you try to do thicker coats, it will streak and drag on you.  I ended up placing the polish on my nails for these 3 fingers.  That worked fine, though it was a tad thick which caused some shrinkage on my middle finger after I applied the TC.  For the rest of my fingers, I learned to do thinner coats.  Once you have 1-2 thinner coats on the nail you can then do a final thicker coat without drag or shrinkage.  This is 2 coats on these fingers, but on the rest of my hand, I did 3 thinner coats for the same result.  I was easily able to reach opacity without having to apply a base color.  One thing I did want to say is that unlike a lot of other hand-mixed/indie polish glitters, the glitter in this one did not sink to the bottom of the bottle, thus requiring a ton of shaking/rolling.  The glitter was equally distributed throughout the bottle.  You also didn't have to go fishing for glitter.  

Unfortunately, this was the only NerdLacquer I ordered.  :(  I'm going to have to rectify that once they reopen their store.  NerdLacquers are available on Etsy, but also at etailers Ninja Polish and Harlow & Co (with the 2 etailers having a few exclusive colors each).  Currently the Etsy store is closed and the 2 etailers are OOS on all polishes.  Though I'm sure they will be back soon.

I purchased mine from Etsy.  Cost was $10 plus $2.50 shipping.

Friday, March 2, 2012

Yesterday's Nails: Sunnyside Up!

I am trying to start a new post series called "Yesterday's Nails".  This will basically be my manicure from the day before.  It's so easy to get caught up in reviews, and I want to start posting more picture of my daily looks.  This also makes me keep polish on my nails.  

This look is 3 coats of China Glaze Happy Go Lucky, from their Spring 2010 collection, with 2 coats of Nubar Black Polka Dot.  I am in love with this yellow.  Can't say enough about it, and if you want to try yellow, I would 100% recommend this one.  No, it's not a pale yellow, but it's super fun and I find it to be very wearable.  Like a typical yellow polish, it does take 3 coats to reach full opacity, but the formula is good, so it's not a big issue.  And because I'm now obsessed with it, I added Black Polka Dot.  If I did this NOTD again, I would probably use white as an accent nail on my ring finger, but by the time I thought of that, I was almost done.  LOL.    

Also, I added one coat of Nubar Diamont, and I have to say that this is now my new favorite top coat.  It applies super easy and is dry in minutes.  It also makes your nails super shiny.  Dear Nubar, please don't change it again.  

Nubar Polka Dots Collection Review

I adore glitter topcoats, especially those with multi-shaped and hex glitter.  So when I saw this little collection of 2 glitter topcoats, I was so excited to try it.  I reviewing this, I decided to follow Nubar's own PR information and swatch the black dots on white and the white dots on black.  For the white and the black base coats, I used OPI Alpine Snow Matte and Color Club Bewitched, respectively.


 Black Polka Dot (over white) - black, multi-shaped glitter in a clear base.  I love this one and it's my favorite of the two.  I love the look of it over white, but I think this would look fabulous on just about any lighter shade (imagine this over pale pink or mint green).  This is 3 coats of Black Polka Dot because I wanted to make sure I had the right amount of little glitter and hex glitter, but you can use as much or as little of this as you like.  Application was great, and I had no glumpyness or glitter drag.  3 coats.

White Polka Dot (over black)- silvery-white multi-shaped glitter in a clear base.  On the nail, this one comes across to me as being more of a silver than a white, but in the bottle, it definitely looks more white.  While I did prefer Black Polka Dot, I loved this one as well, and think this would look amazing over navy.  Also, I wanted to add that when I wore this out in the sun later on in the day, the smaller glitters looked blue and green, so I'm not sure if it was meant to do that or if was maybe something to do with the base color, but I did not see any blue or green in the bottle.  Application was just as great as it's sister.  3 coats.

Also, while I don't have a picture of it, you also get a bottle of Nubar Diamont with this little collection.  Normally, I don't use a topcoat when I swatch, but in this case, I did, because I wanted to see how Diamont performed.  I know in the past, people have had issues with Diamont, because at some point, there was a formula change.  However, with this bottle, I had no issues, so they must have changed their formula back to the original formulation, because this one went on smoothly and was dry in minutes (I may actually LOVE Diamont now).  I used Diamont over both of the swatches above.

All in all, I really like these 2 glitter topcoats.  They are so versatile, that I can't wait to see what I can layer them over.  You can purchase these at Nubar's website.  Price is $20 for the set which includes the 2 glitters, as well as a bottle of Diamont.  

These were sent to me for review